
Payroll Project - December 4 Payroll - Short Version
The payroll project that follows is the online version of the same project you completed manually in Chapter 7 of your text. For this project, you will use the Cengage Learning General Ledger to simulate how a real company would use general ledger software to maintain payroll records and payroll journal transactions. In this project, you are employed by Glo-Brite Paint Company as the person in the accounting department responsible for the company’s payroll processing using the computerized payroll system.
However, unlike the payroll project in Chapter 7, you will only complete the payrolls for the month of December and the optional last quarter and year-end activities. The opening balance file you will use will already contain all the processing for the first two months of the quarter.
Your work will involve the computer processing of the payrolls for the last month of the year and the completion of the last quarter and annual tax reports and forms. You may complete the required deposit, quarterly, yearly, etc., forms described in Chapter 7. If you have already completed these forms for the manual student project, you can use these as a reference as you progress through this project.
To help you get started, the first pay period of December is provided as a tutorial problem that illustrates the principles and procedures required to process payroll transactions using the Cengage Learning General Ledger software. In subsequent pay period processing, whenever a new operational procedure is used for the first time, additional instruction will be provided.
This project has been broken down into several assignments comprising all or part of the project in your text. The assignments are delivered online using the CengageNOWv2 learning management system, with each assignment being graded automatically and submitted to your instructor. Your instructor may choose to have you complete only part of this project, so watch the dates and follow the instructions carefully.
Note: Throughout this project, some of the computer-calculated withholding amounts (e.g., federal income tax) will differ slightly from the amounts (from the tax tables) in the manual payroll project in Chapter 7. This occurs because the computer uses the annualized percentage method to compute withholding taxes, using the percentage method tables rather than the wage bracket method tables used in your text. Also, one- or two-cent differences will occur throughout the solutions because of rounding differences. Finally, some of the account numbers differ slightly from those in your text, but there is a pop-up "Chart of Accounts" available to help you quickly find the accounts you need in the software, or simply click the Chart of Accounts link in the upper left of your screen.Some of the accounting forms in this project can be wider than your computer screen, depending on its resolution. If a form scrolls off the screen to the right, you can maximize screen space by clicking on the << icon on the left menu bar to shrink that menu. You can then grab the top of any form window and drag it to the left of your screen, and use the horizontal scroll bars at the bottom of the form window, or the bottom of your screen, to move the form more comfortably into view.
To get the left menu bar back, just click on the >> icon.
Follow the steps below to complete the December 4 payroll transactions using Cengage Learning General Ledger. To access additional Help for any function, click on the Help button that appears at the bottom of the screen. There is a Help screen with additional information and sample screens for every menu option in the program. Click on the Save and Exit button on your screen at any point to save your work if you need to stop working to continue later. Your work will automatically be restored when you return.
- Set the System Date at the bottom of the screen to December 3, 2017. Note that the year needs to be 2017 in order for the problem to grade correctly.
- Click on the General Ledger tab and select the Chart of Accounts from the Account Lists section. Review this list to understand how the software designates the Payroll accounts.
- Enter the employee maintenance data. Click on the top
bar Payroll
tab and the Maintain
Employees task from the left menu bar.
- Change Catherine L. Ford’s salary amount to $1,280.00 because of a salary increase.
- Change Virginia Russell’s salary amount to $1,260.00 because of a salary increase.
- Scroll down to select employee number 180 (Student), key your own name in the Employee Name field (enter your last name in all capital letters similar to the other employees), then Tab out of the field. Note: Do not change any of the other fields. If you do, your solutions will not be correct.
- Add new employee: Employee number 210; YOUNG, Paul Winston; 7936 Holmes Drive, Philadelphia, PA 19107-6107; social security number, 000-00-6057; single, salaried, $1,260.00; number of pay periods per year, 26; withholding allowances, 1; Account No. 53 (Sales Salaries).
- Click on the Close button, and click "Yes" to accept your changes.
- Enter and post the following transaction, which is
shown in Figure A-9 below.
- December 3: Deposited the Pennsylvania state
income taxes withheld from the November 20
payroll (Employees SIT Payable). First determine current account
balances using the General
Ledger Report in the left menu bar under the General Ledger tab.
Look for the outstanding balance in account #25. Next, select the
General Journal task and click on the Add New Entry
button. Enter the first account number (25) or click on the
pop-up Chart of Accounts
icon to display a list for selection. Enter the debit amount to clear
the existing credit to Employees
SIT Payable. Then Tab
to the next row,
or click on Insert
Debit/Credit
again to enter the credit (the same amount) to the Cash
account (11). Finally, click on the Post button to post
this entry to the General Ledger.
- Enter the Payroll transactions for the period using
the detailed
instructions in steps (a) through (i) below. Refer to the
following pay
list for this period.
To enter the payroll records, click on the Pay Employees task from the left menu bar. As noted above, you will probably have to shrink the left menu bar (using the << icon) and grab the top of the Payroll form with your mouse to reposition it to better fit on your screen. You should also scroll over to grab the lower right corner of the form to drag it down to fill the screen.- The
prior months' payroll information is already entered, and will show up
in the reports, but NOT in the payroll entry screens. Click
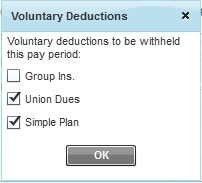
on the Deductions
button to display the Voluntary
Deductions check boxes. Uncheck the Group Insurance, but
check Union Dues
and
Simple Plan (which
is the same as Simple Contributions Payable) boxes, and click OK.
- For each pay period, you will need to add a new record to this payroll register for each employee to be paid. Click on the Add button to add a new pay record for each of the above employees, and then enter the corresponding fields. You may need to scroll down to the bottom of the payroll form to see the newly-added line.
- Date: Use the pop-up calendar to change the date to 12/04/17. Payroll recording is very dependent on having the correct dates, so verify this date, especially for the first employee in any payroll set.
- Employee
Name: Select the name from the drop-down list or key the
first letter of the employee's last name until the correct name
appears.
- Check No.: Start with check number 712 to continue from where the previous month left off. This number will automatically increase by 1 for each subsequent employee. It is critical to get this check number correct for each employee, along with the date, as this is how the software matches up your entries for grading.
- Salary or Hours worked: For salaried employees, the salary should display automatically. For hourly employees, click on the Reg. Hours field and enter the number of regular work hours shown above. When shown, enter the number of hours in the "OT 1 1/2" and "OT Double" boxes to record the appropriate overtime hours. Note that you need to enter the salary amount shown for Beth Anne Woods to override the regular salary amount.
- For the two union employees noted above, change the Union Dues field to $8, which is this period's dues amount.
- Click on the Calculate Taxes button for each employee to fill the remaining fields. Net Pay will calculate automatically, and Gross Pay will display at the bottom of the form. Review the amounts calculated for reasonableness.
- Click Add to start a new employee or Close when done. You may need to confirm the data you entered or the changes you made. If you make a mistake, just go to the appropriate line and field, and change the value. Click on the Calculate Taxes button again to recalculate those amounts. Net Pay will re-compute automatically.
- The
prior months' payroll information is already entered, and will show up
in the reports, but NOT in the payroll entry screens. Click
on the Deductions
button to display the Voluntary
Deductions check boxes. Uncheck the Group Insurance, but
check Union Dues
and
Simple Plan (which
is the same as Simple Contributions Payable) boxes, and click OK.
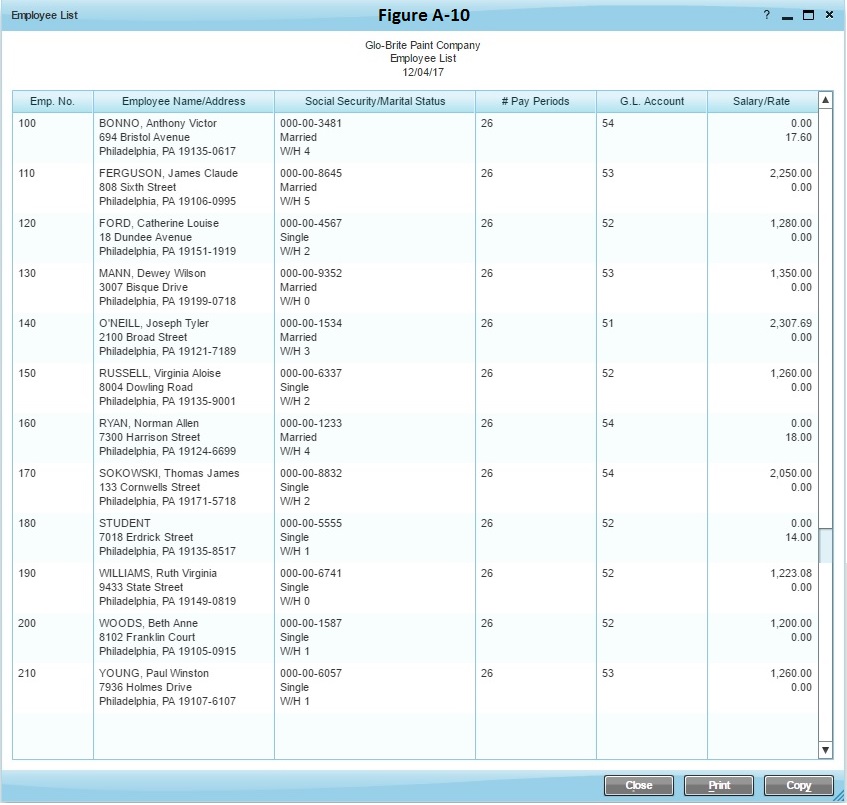
- Display the Employee List report.
Click
on
the Employee List
from the Payroll
left menu bar. The report is shown in Figure A-10 below. Verify the
accuracy of the maintenance input from step 4 above and make any
corrections via the Maintain
Employees menu option.
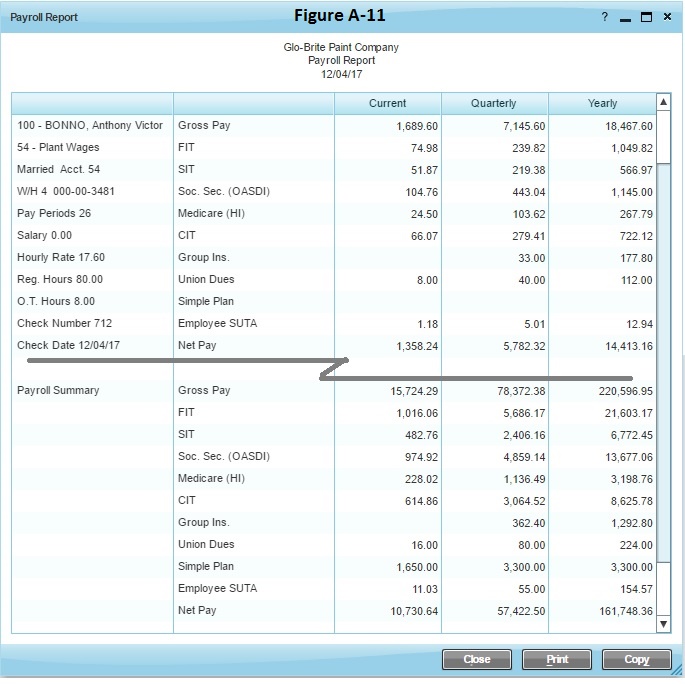
- Display the Payroll report. Click on the Payroll Report item
from the left menu bar. The payroll report for Employee 100;
Bonno, Anthony Victor, followed by the payroll summary, is shown in
Figure A-11. Due to its length, only the first employee and the summary
are shown. If the summary is incorrect, review the list of employees to
be paid from Step 5 above. Check your
numbers, and make any changes using the Pay Employees task.
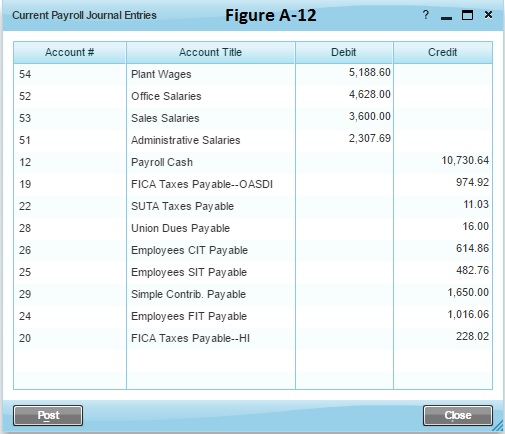
- Generate and post the journal entry for the current
payroll. Click on the Current
Payroll Journal Entry task on the left menu
bar. Click Yes
when asked if you want to generate the journal entry. If
your journal entries do not match those shown in Figure A-12, check
your
employee list and payroll report for keying errors, and go back to make
the necessary corrections. If they are
correct, click on Post.
The journal entry will reappear, posted, in the General
Journal. Note:
The software combines both the entries for Employee's SUTA Tax Payable
and Employer's SUTA Tax Payable into one account.
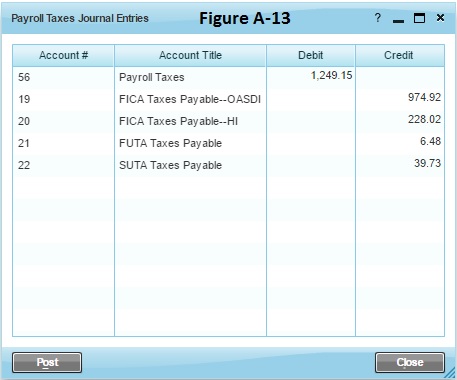
- Generate and post the employer’s payroll taxes
journal entry. Click on the Employer’s
Payroll Taxes Journal
Entry task on the left menu bar. Compare
your entries
as they appear in the Payroll
Taxes Journal Entries dialog box, to Figure A-13
below. Click Yes
when asked if
you want to generate the journal entry. If they are correct, click on Post, otherwise go
back and re-check your inputs. After you accept the entries, they will
reappear, posted, in the General Journal.
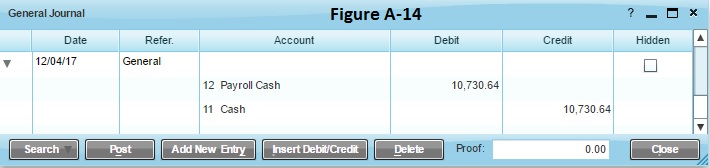
- Enter and post the December 4 General Journal entry
to
record the deposit of cash for the total net amount owed to employees
in the payroll cash account. This is also found as the current period Net Pay value on the
Payroll Report. Click on the General
Ledger top
tab and the General
Journal task. Enter the transaction shown in Figure
A-14 below by first clicking on the Add
New Entry button. Verify the date and enter General as the
reference. Next, click on the Insert
Debit/Credit button, enter the first account number (12) or click on the
pop-up Chart of Accounts
icon to display a list for selection. Enter the debit amount to clear
the existing credit to Payroll
Cash from the first journal entry above. Then Tab to the next row,
or click on Insert
Debit/Credit
again to enter the credit to the Cash
account. Finally, click on the Post button to post
this entry to the General Ledger.
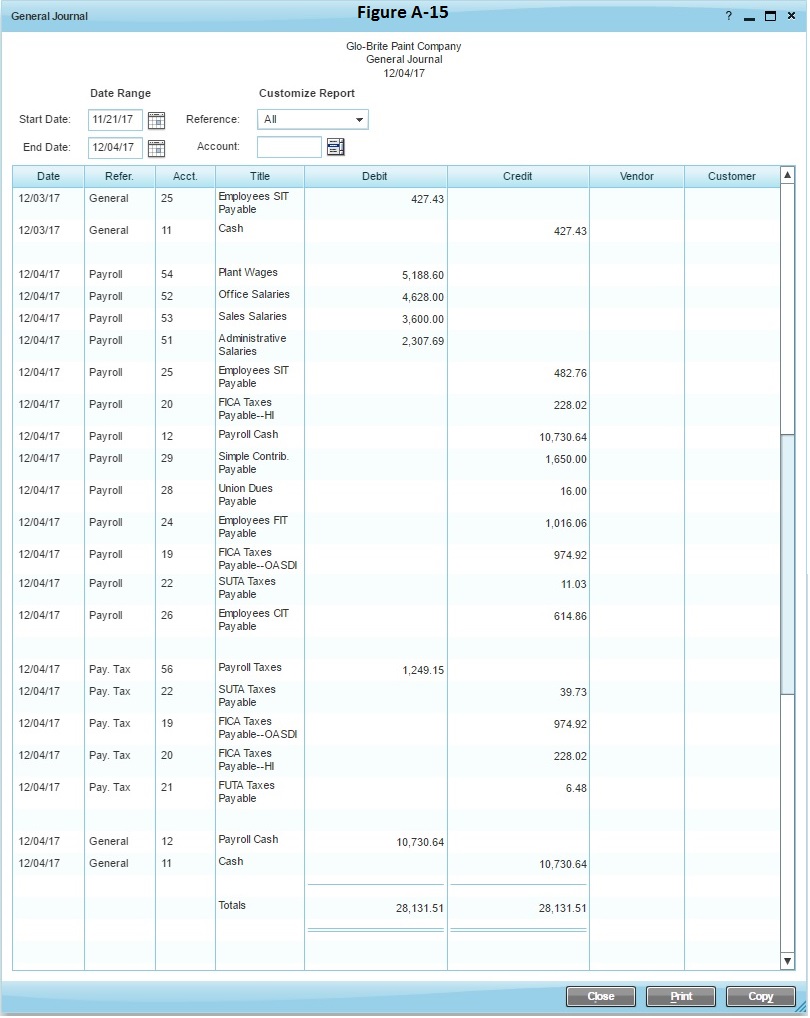
- Display the General Journal report. With the General Ledger tab
still displayed, click on the General
Journal report from the Journal Reports
section of the left menu bar. The General Journal report is
shown in Figure A-15. Note that you need to change the dates
of the
report to match the dates of the assignment, 11/21/2017 through
12/04/2017. You can also customize the report to
display only certain Reference
values or account numbers.
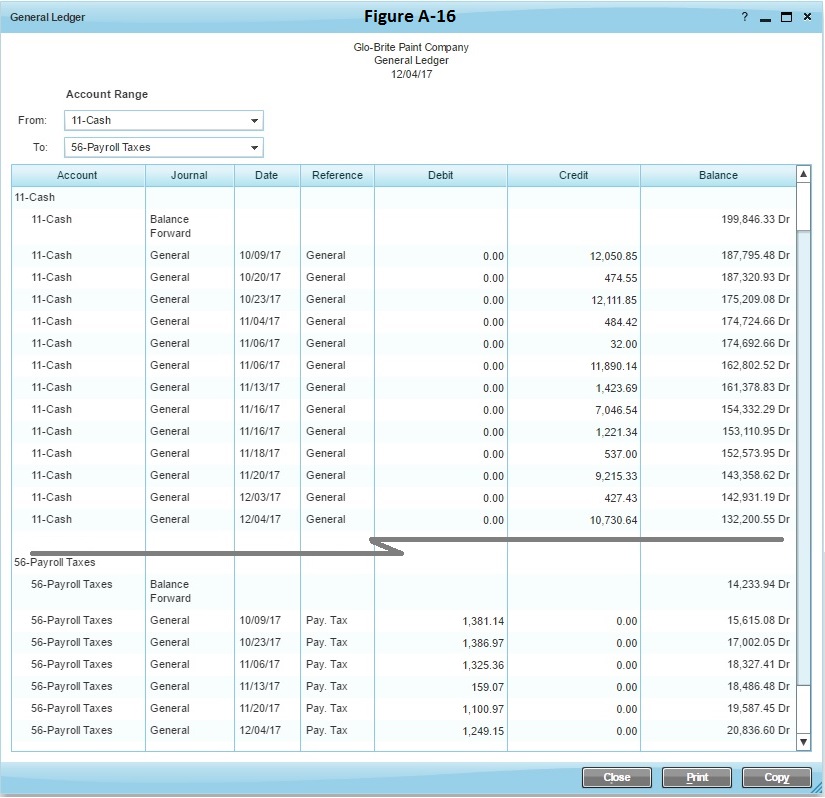
- Display the General Ledger report. With the General Ledger top
tab selected, click on General
Ledger from the Ledger
Reports section of the left menu bar. A partial General
Ledger
report is shown in Figure A-16. You can also
customize
this report to list only a selected range of accounts.
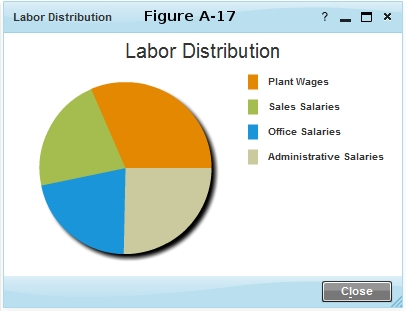
- Generate a labor distribution graph. Click on the Company top tab and
the Labor Distribution
item from the left menu bar to generate the graph shown in
Figure A-17. Note that the software creates the graph from the
year-to-date values, rather than the month-to-date values in the key.
- If there is a Check My Work link on lower-right of your screen, click on that link to review your work. Any errors you have will be noted with a red X, so try to locate the source of the errors and correct them. If the account values are incorrect, you will likely find an individual employee listed in the error detail report that is also incorrect. After fixing individual employees using the Pay Employees task, you can delete any of the journal entries, using the General Journal task under the General Ledger top tab, and retry any or all of the steps above.
- When you are comfortable that you have completed all
steps of the problem correctly click on the Submit Assignment for Grading
button on the lower-right of your screen. You will be graded primarily
on three criteria for the payroll problems:
- Are the pay settings for each employee correct (rate, deductions, etc.)?
- Are all period's payroll entries correct for each employee?
- Are the ending balances in each General Ledger account correct?


