
Follow the steps below to complete the Introduction to General Ledger Online assignment. Each assignment will have an instruction page similar to this one, which will guide you through the steps required to complete a text problem using General Ledger Online. Note that most of these instruction pages have a frame to the left that contains additional graphics, usually of the text assignment itself, which you can toggle on or off, depending on your screen size. You can practice toggling these frames on and off now.
You can also print these instructions using the Print Instructions link above. Ask your instructor before printing any of these assignments, as printer setups vary by school.
In this assignment, you will walk through the key features of this online general ledger, make a simple journal entry, and submit the assignment to your instructor for grading. First, we will look at some basic functions of the CengageNOW learning management system, which handles the timing, saving, and grading of the assignment.
- At
the top left of your screen is information regarding the name of the
assignment. Usually, this will be an end-of-chapter problem from your
textbook. Most of the time there is only one problem per assignment,
but your instructor could combine multiple problems into one
assignment, in which case the left bar will let you navigate from
problem to problem without leaving the assignment.

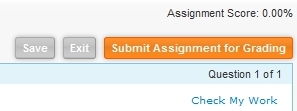
- At the top right are buttons for saving your work,
exiting the assignment without saving, or submitting your assignment
for grading. You can save your work at any time, and then come back
later to complete your assignment. The last saved version of your
assignment will automatically be displayed when you select your
assignment, and then you can continue from where you left off. Your
instructor may
enable the Check
Your Work link, which allows you see which parts of the
assignment you have completed correctly. If you select Submit Assignment for Grading,
you will be able to see which parts of the problem you answered
correctly, and you instructor may or may not give you the option to
take the assignment again.
- Now we will walk through the key parts of every General Ledger Online
problem. Immediately underneath the Save
and Submit
buttons, a row of tabs will be displayed. Each tab represents a
different "subsystem" found in most commercial general ledger programs.
Notice that the Company
tab is initially highlighted, and that some of the tabs, for
instance Purchases,
are dimmed out. This indicates that the current assignment does not use
these subsystems, so you will not need to use these functions. Most of
your work, for most assignments, will be done under the General Ledger tab.

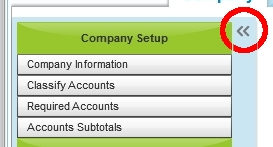
- On the left side of the screen is the Taskbar. This menu
will change whenever you click on a different top-row tab.
You are currently seeing the taskbar for the Company tab, which
holds basic functions for company information setup. You can
"hide" this taskbar if you need more screen space by clicking on the <<
icon highlighted with the red circle below. Click on this icon, and the
menu should "hide" on the left side of your screen. Then click on the >>
icon to bring the taskbar back.
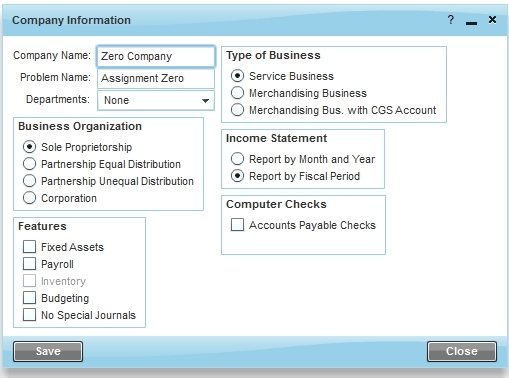
- Click on the Company
Information task on the left taskbar, and you will see a
window pop-up similar to the one below. Most functions will display a
window, which you can click on with your mouse to move around the
screen, minimize, or remove. Normally you will not be asked to change
the information on this screen, but you can see how this problem has
been set up. As you progress through your text, different company setup
options will be explored. The question mark icon will display the Help menus, which
you will explore in the next step. Close this window by
clicking on
the Close
button, or the X
in the upper-right corner, when you are done experimenting with
the window.
- At the bottom of the screen, you will see some
additional buttons. The System
Date is the initial date used to begin entering
transactions or for displaying reports. Click now on the pop-up
calendar to the right of the date to set this date to November 1 of the
current year. The Instructions
button will re-display the instructions you are currently reading in
another browser window or tab. The Calculator
button will display a pop-up calculator that you may find helpful for
calculating values required to solve the problem. The Help button
displays, in another browser window or tab, a detailed set of
instructions and examples for every program function. You can explore
the Help
system now by clicking on a few options in the left menu of the Help
screen. Close the window or tab when you are done exploring
Help. The Close all
windows button will close all open general ledger windows
currently on your screen.

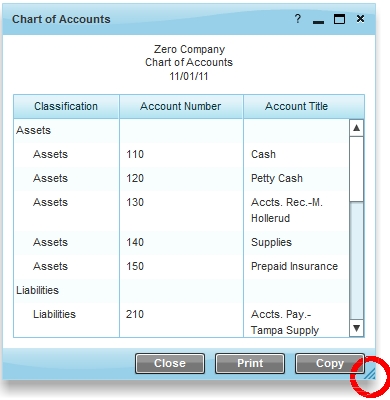
- Click on the General
Ledger tab and review the new taskbar on the left. The Tasks section at the
top of the menu is where you will find most common functions for entering
transactions into the General
Journal and the various special journals, such as the Cash Payments Journal.
Below these tasks are various reports and statements frequently used in
conjunction with General Ledger transactions. For instance, under Account Lists, click
on the Chart of Accounts.
This will display the chart of accounts for the company being
represented in this problem. Scroll down this list to review it. Notice
that this window, and many others, can be resized by clicking and
dragging at the lower-right corner of the window, highlighted with a
red circle below. You can also print the contents of this window, or
copy it to a file that can be read into Excel and other spreadsheet
programs.
- In a similar manner, display and review the Trial Balance, found under the Ledger Reports section, and the Income Statement, found under Financial Statements (you may need to scroll down the taskbar to find these options). Close these windows when you are done reviewing them to clear them from the screen.
- Now you are going to create a simple General
Journal entry, by scrolling back up to the top Tasks section of the
taskbar and selecting the General
Journal task. A blank version of the example below will be
displayed.
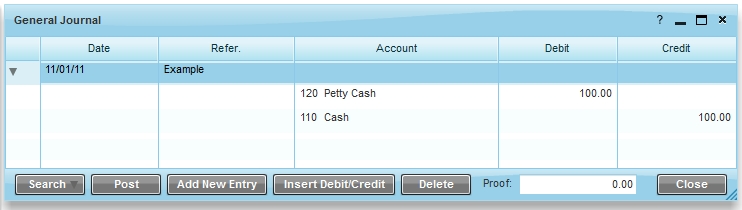
- To re-create the above transaction, first click on the Add New Entry button. The system date, which you had changed above, will be displayed under the Date column. You could change the date by clicking on it and re-entering the date, or using the pop-up calendar that will appear, but leave it alone for now and click under the Refer. column. Enter Example as the reference for this transaction, as shown above
- Next, you will need to click on the Insert Debit/Credit button for each debit or credit line. When you click on this button the first time, the Account field will highlight. If you know the account number (120 in this case), you can just type it in. Or you can click on the icon next to the field, displaying a pop-up Chart of Accounts, which will let you browse and select this account. Try it both ways.
- Next, enter the debit dollar amount in the Debit field (100 in this case). If you leave off the cents, the program will add the cents when you either hit Enter or the Tab key. Notice that the Proof field will now show a 100.00 balance. You will need to get this number to zero before you can post this transaction.
- Click on the Insert Debit/Credit button again. Enter the Cash account (number 110) and enter the credit value of 100 in the same manner. Note that the Proof total should now be zero because you entered an offsetting credit transaction.
- At this point, you could continue to enter debit or credit fields in the same manner if the problem requires it. We are done with this transaction, however, so click on the Post button to post this transaction to the General Ledger. A pop-up message will tell you if the Post is successful.
- Even after you post the transaction, you could click on any field in the journal entry to change it if you later discover an error, although you would have to post your transaction again. The other buttons on this window will let you Search for a particular transaction if there were many transactions in the problem, or Delete a bad transaction completely in order to start over.
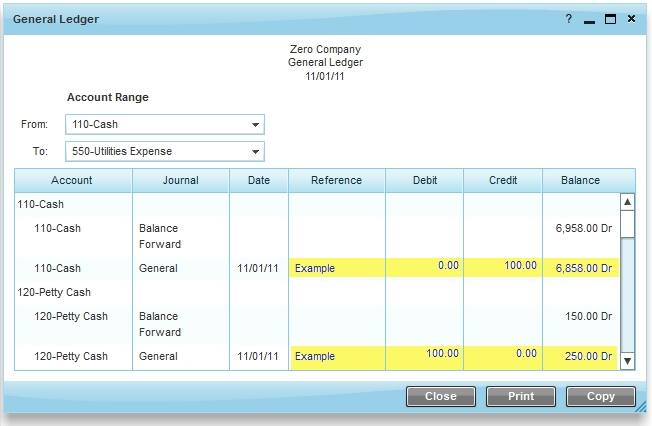
- The best feature of General Ledger programs is that
the posting from the journals to the General Ledger is done at the
click of a button, as you have just done. Review the General
Ledger report by finding it under the Ledger Reports
section of the taskbar. It should look similar to the example below.
The highlighted area of this example shows where to find the effect of
your transaction on these two accounts.
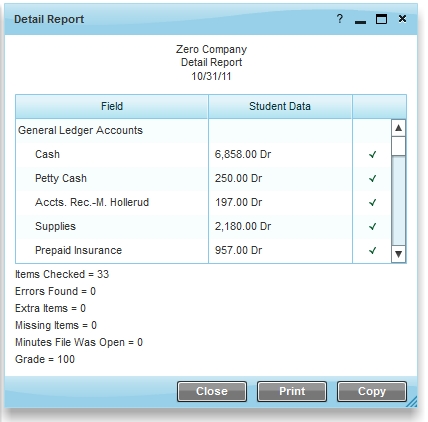
- At this point you can continue to explore General Ledger Online,
or you are now ready to submit the assignment to your instructor. Click on
the Submit Assignment
for Grading button at the top of the screen. If you have
entered the transaction correctly, you should receive a grade of 100%, or the maximum number of points the instructor has
set for this assignment. You can view the Detail Report shown below by selecting View Assignment Results. In general, you are
graded on getting every General Ledger and sub-ledger account to its correct balance, rather
than being graded on the journal entries themselves. If you see a red X
next to an account, then you have made an incorrect transaction
somewhere in the problem.
- You can now select the option to Sign Out of General Ledger Online, or continue on with another assigned problem.


